Calculate the coverage of the fire-extinguishing equipment based on the most current version of your BIM model. Add fire-fighting equipment such as extinguishers and fire hose reels directly to your Revit® building model from the plug-in and the coverage of the fire extinguishing equipment will be automatically calculated in accordance with the guidelines of the Buildings Decree and NEN 4001.

- Click on the 'extinguisher coverage' button with the fire hose icon on the left in order to display the coverage in the floor plan. The plug-in shows the current coverage per floor.
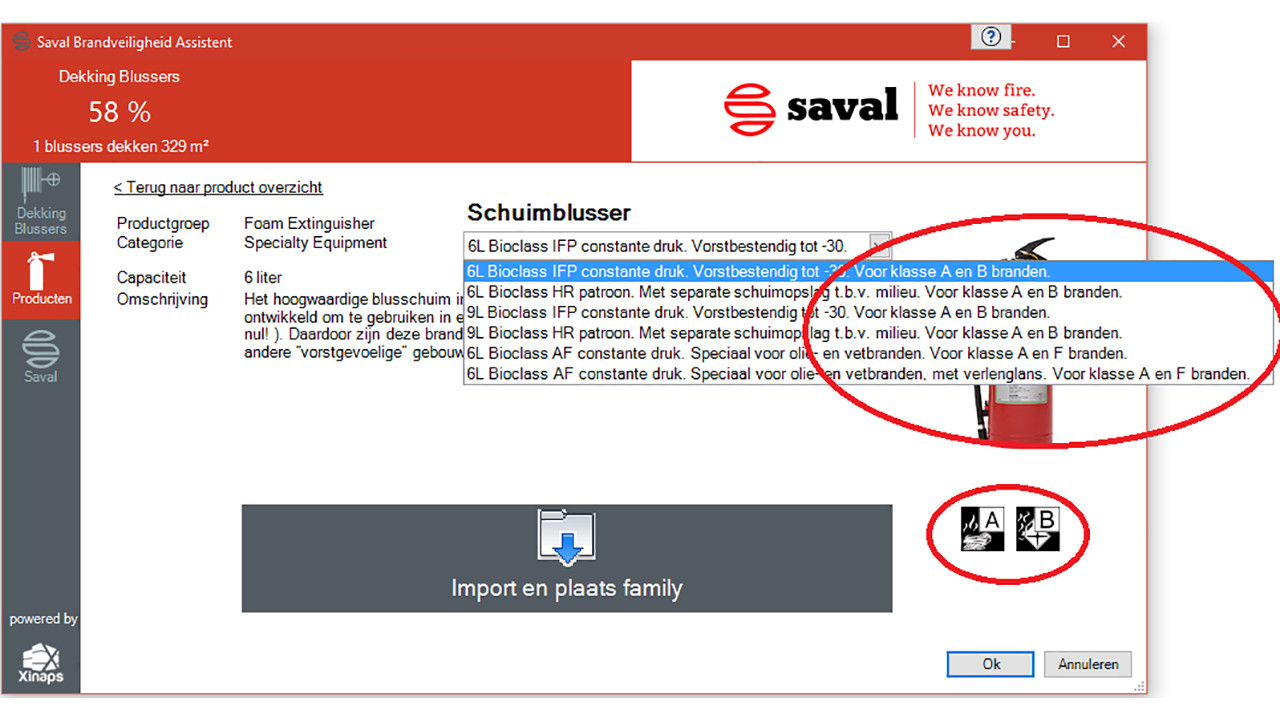
- In order to load fire-fighting equipment in the project, click on the 'products' button and select the required product by clicking on it. You can also amend the type and size of the product by clicking on the arrow in the menu and selecting the product. Then click on 'import and place family' to import the object in Revit® and place it in your model.
Requirements: 'rooms'
In order to use Saval Brandveiligheid Assistent™ properly, you need to add 'rooms' in the model. The plug-in uses the area of all the 'rooms' defined in the model. Without 'rooms', the plug-in cannot use the required area and cannot calculate the coverage of the fire-fighting equipment.
Requirements: 'doors'
In order to use Saval Brandveiligheid Assistent™ properly, you need to add ‘doors’ and use them correctly. In the calculation, the plug-in treats doors as elements which can be entered with a fire extinguisher and or fire hose. If a door is a 'fire door', specify this when setting the 'wall type' for a 'wall family'. More about 'walls' >>
Requirements: 'walls'
In order to use the plug-in properly, you need to add 'walls'. 'Walls' are required to add 'rooms'. If a 'wall' does not contain a door, it cannot be passed through with an extinguisher and/or fire hose. If a 'wall' is part of a fire compartment, it must be set as a fire wall. More about ‘fire compartments’ >>
Requirements: 'extinguishers'
In order to calculate the coverage of the fire-fighting equipment, you need to add 'extinguishers'. Fire extinguishers may be found under the 'products' button with the fire extinguisher icon. In order to load fire extinguishers in the project, click on the ‘products’ button and select the required product by clicking on it. You can also amend the type and size of the product by clicking on the arrow in the menu and selecting the product. There is an image for each product, under which the fire class of the product may be found. This enables you to select the right product for your design. Next, click on ‘import and place family’ to import the object in Revit® and place it in your model.
Project units
Saval Brandveiligheid Assistent™ reads and uses the following 'units' from Revit®, including decimal symbol and digit grouping. You can change these in Revit.
- Common – Area
- Common – Length
Products
Various products may be found under the 'products' button. There is an image for each product. You can select a product by clicking on the image, after which you enter a menu. The menu shows the properties along with the description of the product. By clicking on the arrow, you can select another type of the same product. In order to use the products in your Revit® model, click on 'import and place family', after which the element will be loaded into your project and you can place it. In order to return to the overview, click on 'back to product overview'.
Fire classes
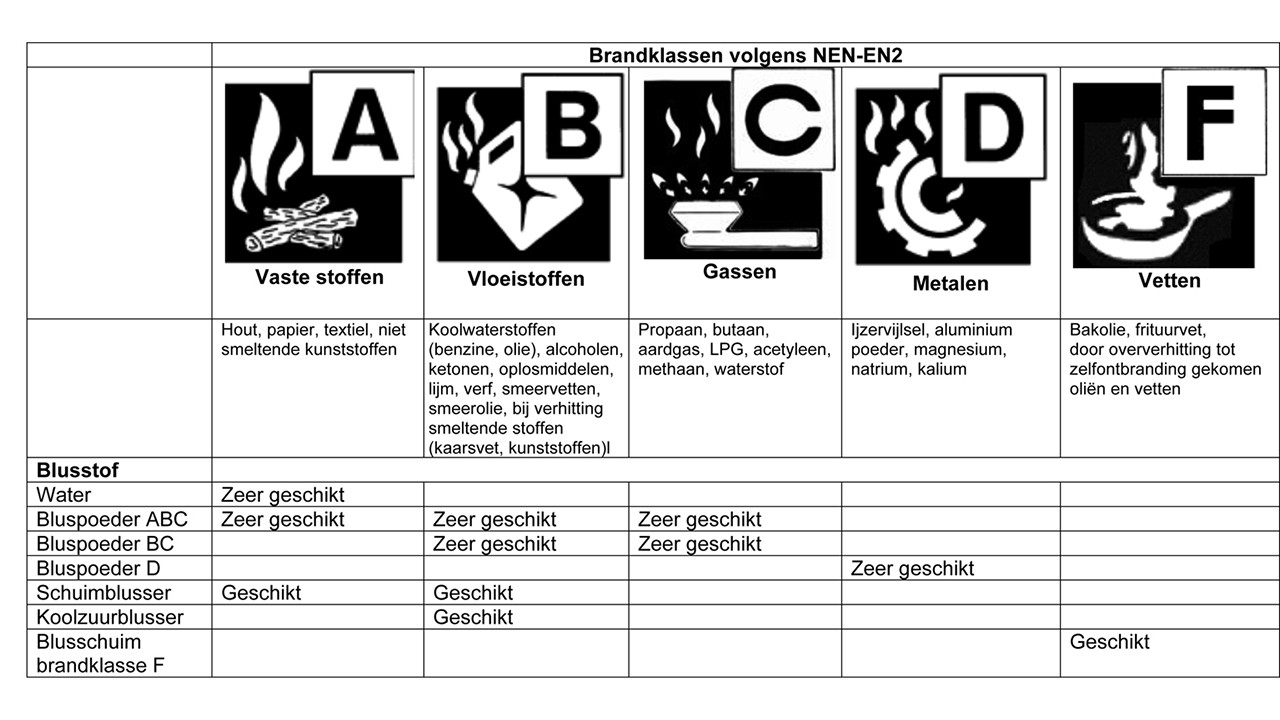
NEN-EN 2 divides the different types of fires into five fire classes (A-F), depending on the type of combustible material. The different fire classes are: A, B, C, D, E and F (there are six because fire class E (electricity) needs to be handled separately due to specific aspects of this type of fire, even though in principle it is a class A-B fire). This is particularly important for fighting a fire with a fire extinguisher. The fire extinguisher has a pictogram on it and the letter(s) of the relevant class(es). These fire classes are indicated under the image of the product and in the titles of several of the products in the product menu.

3D Visualisation
In order to display a 3D visualisation of your project showing the fire-fighting equipment coverage, click on the 'extinguisher coverage' button and then on the 3D Visualisation button at the bottom of the app. An extra window will open in which the extinguisher coverage is displayed per floor in 3D.
Extinguisher coverage display of a floor
In order to display the extinguisher coverage of a particular floor, click on the 'Extinguisher coverage' button. A floor plan will be generated in which the coverage is visualised. In order to display a different floor, click on the drop-down menu and select the required floor. In order to display a floor above or below the current floor, use the up or down arrows.
Floor plan in Revit®
In order to display the floor plan Revit®, click on the 'floor plan in Revit' button. The plug-in will then display the floor plan in the same way that it is displayed in the plug-in in Revit®.